本文最后更新于 592 天前,如有失效请评论区留言。
主要问题
Apollo客户端的配置主要集中在2部分,这就导致割裂了配置,十分不便:
ApolloApplicationContextInitializer
在spring-boot环境下,该类中,通过对配置项apollo.bootstrap.enabled的开启,来达到Apollo在spring-boot环境下的autoconfig,其中主要是initialize方法中,对于指定配置,从spring的properties中加载到system.property里去,因为Apollo本身所有配置都是支持system.property的,所以通过这么实现,可以对原有的配置加载体系没有侵入。
关键代码如下(部分无关代码已省略):
public class ApolloApplicationContextInitializer implements
    ApplicationContextInitializer<ConfigurableApplicationContext> , EnvironmentPostProcessor, Ordered {
  //对应的会被从spring.properties中转移到system.property中的参数名
  private static final String[] APOLLO_SYSTEM_PROPERTIES = {"app.id", ConfigConsts.APOLLO_CLUSTER_KEY,
      "apollo.cacheDir", "apollo.accesskey.secret", ConfigConsts.APOLLO_META_KEY, PropertiesFactory.APOLLO_PROPERTY_ORDER_ENABLE};
  //实现spring提供的接口,里面进行配置的转移
  @Override
  public void postProcessEnvironment(ConfigurableEnvironment configurableEnvironment, SpringApplication springApplication) {

    // should always initialize system properties like app.id in the first place
    //主要就是这个方法
    initializeSystemProperty(configurableEnvironment);

    Boolean eagerLoadEnabled = configurableEnvironment.getProperty(PropertySourcesConstants.APOLLO_BOOTSTRAP_EAGER_LOAD_ENABLED, Boolean.class, false);

    //EnvironmentPostProcessor should not be triggered if you don't want Apollo Loading before Logging System Initialization
    if (!eagerLoadEnabled) {
      return;
    }

    Boolean bootstrapEnabled = configurableEnvironment.getProperty(PropertySourcesConstants.APOLLO_BOOTSTRAP_ENABLED, Boolean.class, false);

    if (bootstrapEnabled) {
      initialize(configurableEnvironment);
    }

  }
  //可以看到只操作了final static数组里定义的那个列表
  void initializeSystemProperty(ConfigurableEnvironment environment) {
    for (String propertyName : APOLLO_SYSTEM_PROPERTIES) {
      fillSystemPropertyFromEnvironment(environment, propertyName);
    }
  }
  //直接把存在的参数加到系统参数中去,有点暴力
  private void fillSystemPropertyFromEnvironment(ConfigurableEnvironment environment, String propertyName) {
    if (System.getProperty(propertyName) != null) {
      return;
    }

    String propertyValue = environment.getProperty(propertyName);

    if (Strings.isNullOrEmpty(propertyValue)) {
      return;
    }

    System.setProperty(propertyName, propertyValue);
  }
DefaultProviderManager
另一部分参数,即env以及apollo.configService这两个主要参数,通过DefaultProviderManager类中对DefaultServerProvider的加载实现,这两个类都是Apollo自定义的类,主要功能仅支持从系统变量,jvm启动参数,指定文件目录读取这两个配置。
主要实现代码:
public class DefaultServerProvider implements ServerProvider {
  private static final Logger logger = LoggerFactory.getLogger(DefaultServerProvider.class);
  private static final String SERVER_PROPERTIES_LINUX = "/opt/settings/server.properties";
  private static final String SERVER_PROPERTIES_WINDOWS = "C:/opt/settings/server.properties";

  private String m_env;
  private String m_dc;

  private Properties m_serverProperties = new Properties();

  //可以看到主要就是从2个固定的目录去读一个特定的文件,如果读不到,后续就是从系统变量和jvm取了
  @Override
  public void initialize() {
    try {
      String path = Utils.isOSWindows() ? SERVER_PROPERTIES_WINDOWS : SERVER_PROPERTIES_LINUX;

      File file = new File(path);
      if (file.exists() && file.canRead()) {
        logger.info("Loading {}", file.getAbsolutePath());
        FileInputStream fis = new FileInputStream(file);
        initialize(fis);
        return;
      }

      initialize(null);
    } catch (Throwable ex) {
      logger.error("Initialize DefaultServerProvider failed.", ex);
    }
  }
  //获取参数时的处理
  private void initEnvType() {
    // 1. Try to get environment from JVM system property
    m_env = System.getProperty("env");
    if (!Utils.isBlank(m_env)) {
      m_env = m_env.trim();
      logger.info("Environment is set to [{}] by JVM system property 'env'.", m_env);
      return;
    }

    // 2. Try to get environment from OS environment variable
    m_env = System.getenv("ENV");
    if (!Utils.isBlank(m_env)) {
      m_env = m_env.trim();
      logger.info("Environment is set to [{}] by OS env variable 'ENV'.", m_env);
      return;
    }

    // 3. Try to get environment from file "server.properties"
    m_env = m_serverProperties.getProperty("env");
    if (!Utils.isBlank(m_env)) {
      m_env = m_env.trim();
      logger.info("Environment is set to [{}] by property 'env' in server.properties.", m_env);
      return;
    }

    // 4. Set environment to null.
    m_env = null;
    logger.info("Environment is set to null. Because it is not available in either (1) JVM system property 'env', (2) OS env variable 'ENV' nor (3) property 'env' from the properties InputStream.");
  }
}
改造思路
java-agent对ApolloApplicationContextInitializer.postProcessEnvironment进行拦截
直接上代码,这里拦截使用了bytebuddy
<dependencies>
        <dependency>
            <groupId>net.bytebuddy</groupId>
            <artifactId>byte-buddy</artifactId>
            <version>1.10.22</version>
        </dependency>
        <dependency>
            <groupId>net.bytebuddy</groupId>
            <artifactId>byte-buddy-agent</artifactId>
            <version>1.10.22</version>
        </dependency>
        <dependency>
            <groupId>org.springframework</groupId>
            <artifactId>spring-core</artifactId>
            <version>4.3.16.RELEASE</version>
            <scope>provided</scope>
        </dependency>
    </dependencies>
    <build>
        <plugins>
            <plugin>
                <groupId>org.apache.maven.plugins</groupId>
                <artifactId>maven-compiler-plugin</artifactId>
                <configuration>
                    <source>1.8</source>
                    <target>1.8</target>
                </configuration>
            </plugin>
            <plugin>
                <groupId>org.apache.maven.plugins</groupId>
                <artifactId>maven-shade-plugin</artifactId>
                <version>3.2.4</version>
                <executions>
                    <execution>
                        <phase>package</phase>
                        <goals>
                            <goal>shade</goal>
                        </goals>
                    </execution>
                </executions>
                <configuration>
                    <artifactSet>
                        <includes>
                            <include>net.bytebuddy:byte-buddy:jar:</include>
                            <include>net.bytebuddy:byte-buddy-agent:jar:</include>
                        </includes>
                    </artifactSet>
                </configuration>
            </plugin>
            <plugin>
                <groupId>org.apache.maven.plugins</groupId>
                <artifactId>maven-jar-plugin</artifactId>
                <version>2.6</version>
                <configuration>
                    <archive>
                        <manifestEntries>
                            <Premain-Class>cn.intotw.springconfig.apollo.AgentMain</Premain-Class>
                            <Can-Redefine-Classes>true</Can-Redefine-Classes>
                        </manifestEntries>
                    </archive>
                </configuration>
            </plugin>
        </plugins>
    </build>
//拦截主函数
public class AgentMain {

    public static void premain(String agentArgs, Instrumentation inst) throws ClassNotFoundException {
        System.out.println("进入premain");
        System.out.println("isRedefineClassesSupported: " + inst.isRedefineClassesSupported());

        new AgentBuilder.Default()
                .type(ElementMatchers.named("com.ctrip.framework.apollo.spring.boot.ApolloApplicationContextInitializer"))
                .transform((builder, type, loader, module) -> builder
                        .method(named("postProcessEnvironment"))
                        .intercept(MethodDelegation.to(SpringConfigInterceptor.class)))
                .installOn(inst);
    }

}
//拦截器
public class SpringConfigInterceptor {
    private static final String[] APOLLO_SYSTEM_PROPERTIES_APPEND = {"env","apollo.configService"};
    @RuntimeType
    public static void intercept(@Argument(0) Object args1, @SuperCall Callable<?> callable) throws Exception {

        try {
            initializeSystemProperty((ConfigurableEnvironment) args1);
            callable.call();
        } finally {
            System.out.println("after advice");
        }
    }
    static void initializeSystemProperty(ConfigurableEnvironment environment) {
        for (String propertyName : APOLLO_SYSTEM_PROPERTIES_APPEND) {
            fillSystemPropertyFromEnvironment(environment, propertyName);
        }
    }
    static void fillSystemPropertyFromEnvironment(ConfigurableEnvironment environment, String propertyName) {
        if (System.getProperty(propertyName) != null) {
            return;
        }

        String propertyValue = environment.getProperty(propertyName);

        if (propertyValue==null ||"".equals(propertyValue)) {
            return;
        }

        System.setProperty(propertyName, propertyValue);
    }
}
其实主要就是对该函数的加载进行拦截,复制一段代码增加一下对自定义参数的读取,原理一模一样。
代码放到github上了[https://github.com/IntoTw/apollo-springconfig-support]
通过Apollo的SPI支持,实现自己的DefaultProviderManager来替换
翻源码的时候发现,Apollo对于DefaultProviderManager提供了SPI支持,所以也可以直接通过实现com.ctrip.framework.foundation.spi.ProviderManager接口,来直接用自己的配置加载实现替代原有实现。
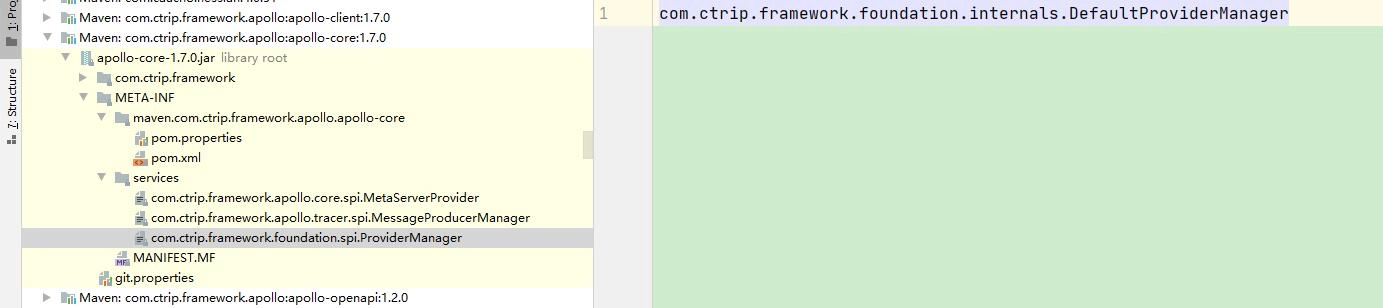
- 在resources文件下新建META-INF/services/com.ctrip.framework.foundation.spi.ProviderManager文件。
- 文件内容为自己实现的接口,代码随便抄抄源码然后改一下就行了。


SPI部分代码:
public class MyProviderManager implements ProviderManager {
    @Override
    public String getProperty(String name, String defaultValue) {
        return null;
    }

    @Override
    public <T extends Provider> T provider(Class<T> clazz) {
        return null;
    }
}
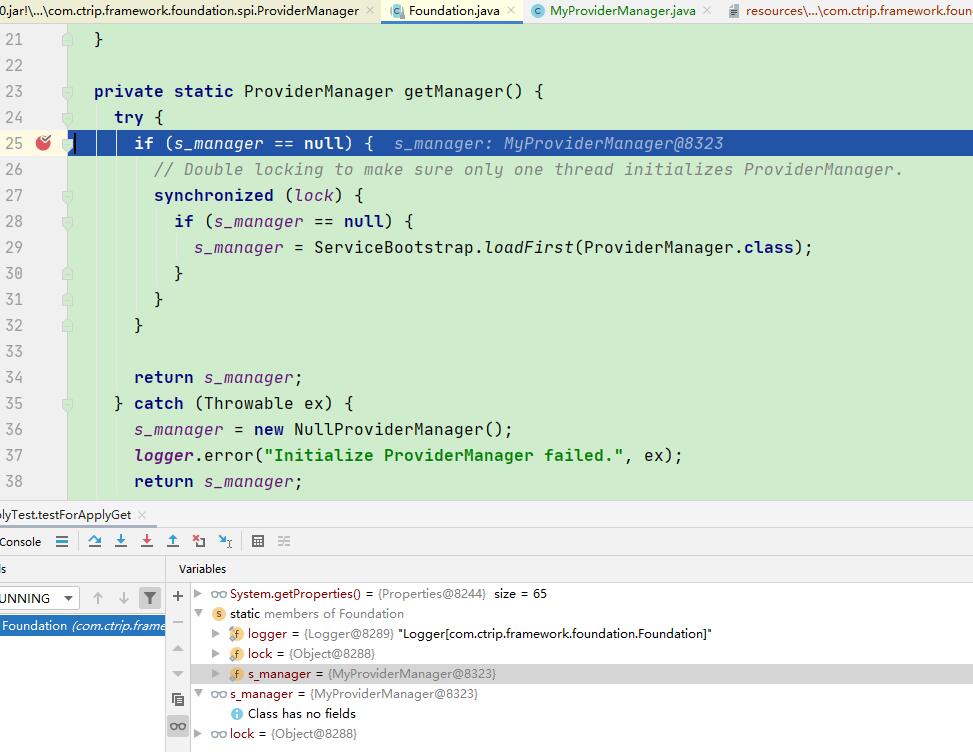
debug,可以看到此时加载的已经是我们实现的自己的manager了。